• Entertainment
  • Musicians
  • My Experiences
  • Playing Guitar

Guitar Licks and Tips

  • Home
  • Blog
  • About
  • Archives
  • Guest Blogger
  • Links
  • Contact

You are here: Home / Blog

4 Essential Guitar Maintenance Tips

November 9, 2012 by Chris

In order to keep any musical instrument playing at its best, it needs to be properly maintained. The same applies for guitars as well. If a guitar is not well maintained, it will not perform like it is supposed to, no matter how good of a guitarist plays it. A nice guitar does not come cheap and buying even an average quality guitar can be a sizable investment for some folk. In such cases, proper guitar maintenance is crucial to ensure that the guitar functions properly for a very long time. Here are some essential guitar maintenance tips shared by some of the greatest guitarists in the business:

Clean after you play

Most guitarists make the mistake of not cleaning up their instrument after playing it. We would like to think that it is only amateurs who make this mistake, but the truth is that even some of the most experienced guitarists overlook this simple, yet crucial, step. All you have to do is use a soft dry cloth to wipe down the guitar right after playing. Pay special attention to wiping the strings since they are the most likely part of the guitar to pick up oil and dirt.

Polishing is good, but don’t overdo it

Too much of anything is harmful for you, no matter how good it is in small doses. The same relationship exists between guitar and polish. Many a fine guitar has been ruined thanks to owners who were over-zealous with their use of polish. Polishing is good; it gives the guitar a nice shine and provides a protective layer. However, polish too often and you will end up doing more harm than good to the instrument. You don’t go around polishing your wooden furniture once a week, so why do it to your guitar. Polish sparingly and remember to use sensible amounts of polish; you want to polish the guitar, not bathe it.

Keep an eye on the condition of the fingerboard & bridge

Most people simply wipe down the fingerboard and bridge and then forget about them. While it is good to clean them after every use, the wood will start drying out over time. It won’t weaken the guitar structurally, but it will definitely affect the quality of sound produced. A little lemon oil goes a long way to restore the fingerboard and bridge to a condition where they seem to be as good as new. It is possible to buy conditioners in stores specifically designed for this purpose, but none of them can match natural lemon oil. Conditioning the parts requires removal of the strings and is hence, best done only twice a year.

Buy a good case and a humidifier

Everyone probably understands why a good guitar case is an obvious recommendation, but will be stumped about the humidifier. How can a humidifier possibly help with guitar maintenance? Humidity levels are very important for properly maintaining wood and guitars do not get to be the exception to the rule. For naturally humid areas, a humidifier is not required. However, in dry places and air-conditioned studios, the low humidity levels will have a direct affect on the quality of music the guitar produces.

The 4 tips mentioned here may seem very simple, but are in fact essential for proper guitar maintenance.

This guest post is written by Jim Thomas. He helps provide guitar lessons online through his website which helps you choose between beginner, intermediate, advanced and master level programs.


Filed Under: Guitar Maintenance Tagged With: bridge, clean, essential, fingerboard, guitar maintenance, humidifier, humidity, polish, tips

Picking Out a Guitar, and Learning a Tune

November 1, 2012 by Chris

Walking past a music store a person can develop strong desires to play an instrument. A favorite song pops into the head, visions of groupies lining up to hear the latest tune roll forth, and the thump of the bass sound invades the body so that even walking happens in rhythm. For all that want and desire reality hits.  It takes practice to learn the chords. No worries. One can learn to play the guitar in one day.

A music store online or out on some boulevard becomes a place where one needs to make a relationship with the staff. They know things and want one to succeed. Your success is their business. A beginning guitarist needs a good basic guitar. Walking around the store makes for many temptations, but staff can guide one to the best guitar for their individual body and needs.

First Position

The best position of a beginning guitarist is sitting down on a stool or wooden kitchen chair with no arms. A chair or stool with railings becomes preferable since it lets one get in a good position by propping one or both feet. Sit in the chair and elevate one or both knees above your hip just a bit. Notice the curve of the body of the guitar. Look at the sound hole where one will be strumming the strings. Place the curve of the guitar on the right thigh. Glance lovingly up the neck to the head where tuning keys lie. Place the left hand just below the head on the first fret. Now relax the body by taking some deep breaths.

Fingerings

A basic guitar has six strings-numbered. String one lies closest to a person’s feet and plays the high melodic E. String six lies closest to your head and plays the throbbing low bass note E. For the chord play in this article one needs string one, string two, and string three. Take the first finger and place the tip of it near the first fret bar on string two. Press firmly like when one hugs their favorite loved one. Use your finger or a pick and strum only the three bottom strings. Stroke downward in a steady rhythm paying attention to each string. The chord is modified C.

Roll the first finger down to string one. Only stroke the three bottom strings slowly and steadily. The name of this chord is modified G7. To play a song strum modified C four strokes and then change to modified G7 for four strokes. Continue stroking back and forth between the chord sets until smooth and silky.

Sheets

Music for guitar comes in a variety of ways and the music store whether online or on the strip will have choices for one. Standard formats come in sheets and have the music staff, the notes, and the chords. Most guitar players at the least like a line of lyrics with some slash marks and chords up above. Eventually a few tunes one will memorize.  Guitar players like to do things in groups and share freely their techniques. So prepare for acquiring some interesting friends. Below is a folk song that uses the two chords from above. Slash marks mean strum on that word or if it has more than one slash mark; hold that word and strum the amount of slash marks shown. The chord above a word means play that chord and continue to strum that chord until the chord changes. If one does not know the tune it is found in a variety of ways on YouTube. Just type in a search engine box Tom Dooley YouTube and the songs will appear. Lyrics and chords are courtesy of www.cowboylyrics.com.

Tom Dooley?

C

/         /                 /        /       /      / //

Hang down your head Tom Dooley

G7

/         /                 /         /      ////

Hang down your head and cry

G7

/        /                 /          /        ////

Hand down your head Tom Dooley

/              /            /         /     ////

Poor boy you’re bound to die.

Attached Images:
  •  License: Creative Commons image source

Justin Miller is a professional blogger that writes for Jamplay.com. JamPlay is a leading online music educator offering 2,000+ guitar lessons for beginners online in HD.

Filed Under: guitars, Lessons, Music Styles, Playing Guitar Tagged With: buying, chair, chord, curve, fingering, first position, guitarist, learning, music, note, picking a guitar, sheets, store, Strumming, tune, tunes

Anatomy of the Bodacious Curvaceous Guitar

October 31, 2012 by Chris

One has bought the acoustic guitar, played the beginning tunes, felt the muse sit within them, and approve of every loving caress strummed across its six strings.  The decision is made; one is going to do this, and like a lover will explore every nuance and inch of their guitar. It begins like all lovers with the exploration of the anatomy.

Names are given to every part of the guitar, and when taking lessons with music instructors or professional musicians they will use those terms.
Image source - http://www.flickr.com/photos/30498053@N08/3949992541/
Head

The head holds the tuning pegs and keys. The keys loosen and tighten the strings. Humidity, heat, and the amount of playing all effect the sound of the instrument. Guitars need regular tuning like a lover needs regular sessions of tender loving care.

Nut

The nut divides the head from the neck. It functions as a small bridge as well. The strings sit on top of the bridge, and it raises them slightly off the neck letting maximum vibrations occur.

Frets

The neck of the guitar has even increments of fret bars. Fret bars are made of metal. The pressing of the string by your fingers, and the touching to the fret bar makes the guitar talk and sing the melodic melodies people love to hear. Also fret bars function as a reference for a guitarist. Eventually when one plays enough your hand knows where it is because of the fret bars. Much like a long term relationship, one knows what to do in which position to make for the maximum sound.  Moving up each fret moves the sound by half step increments making for a chromatic scale.

Neck

The long shaft lies between the head and body of the guitar.  The part closest the frets is a flat plain made perfect for the touch of fingers in numerous ways to make sound. The back of the shaft comes curved. A guitarist’s thumb plays here. It is the place where a small push starting in the palm of the hand gives the necessary pressure to take the sound where the song needs to go.

Heel

On the backside of the neck shaft where it connects to the guitar the neck juts out. This gives added strength to the shaft and keeps the pressure from forming the chords, and the play of the thumb from overcoming the attachment between head and body. Without it, the neck would come undone from the guitar.

Body and Ribs

The whole bottom part of the guitar comes shaped like a voluptuous female, and has differing names on its surface, side and back.  The shape makes for maximum sound vibrations of great quality.  The top where the playing occurs named the sound board gives the acoustic tonal quality. The sides are sometimes known as the ribs. Ribs take most of the compressive force from the strings. The curving makes for added stiffness, and makes the sound move out front of a guitar player instead of back into the player’s body.  Some guitars have a sound plate which protects the wood from being scooped out after hours of play.

Sound Hole

Though the sound board (the whole top of the guitar) makes the sound vibrations for the song, the sound hole adds to this by resonating and directing the sound forward. Looking inside the guitar through the sound hole one will see the bracing patterns.  Bracing patterns add to the tonal quality of the guitar. It makes sure tonal quality is maintained from the bass register to the soprano register on the instrument.

Saddle or Bridge

The portion of the guitar made so the strings anchor comes as a shapely piece of wood. Strings anchor in several ways. Some guitars have holes that strings are inserted through and tied. Some strings have a ring at the end. Other guitars have holes where strings are inserted, and a peg is inserted afterwards. Bridges raise the strings above the body and transfer vibrations to the sound boards.

Guitar construction for acoustics developed over the centuries by trial and error. As each component became developed it added to the good vibrations that are enjoyed by all today.

  • License: Creative Commons image source

Justin Miller is a professional blogger that writes for Jamplay.com. JamPlay is a leading online music educator offering 2,000+ beginning guitar lessons in HD.

Filed Under: guitars, Playing Guitar Tagged With: anatomy, bodacious, body, bridge, curvaceous, fret, guitar, head, heel, keys, neck, nut, ribs, saddle, sound hole, strings, tunes, tuning pegs

A Buyers Guide for Flanger and Phaser Pedals

September 26, 2012 by Chris

Flanger and Phaser pedals can do great things for your sound, but there are a lot of things to think about before you go shopping for one. This guide explains flanging and phasing, and walks you through some of the big questions you should ask before you buy one.

What are phasing and flanging, and how do they differ?

Flanging and Phasing are similar effects produced in different ways. Both alter your sound by splitting the input source into two paths, an unaffected and an affected tone, and mixing them back together. This causes the waves of the two sounds to interfere with each other, producing the swoop or shimmer (or spooky space-age psychedelia!) we call flanging or phasing.

Flanging is produced by slightly slowing down and speeding up a tone that is then mixed with an unaffected “dry” tone. It originated as a tape effect produced by recording the same sound onto two different tape decks and mixing them together on a third tape while slightly slowing down and speeding up one of the machines. In most cases, flanging is now produced via analog or digital signal processing, and not tape. Phasing has always been a signal processing effect. It uses an “all pass filter” to force some frequencies of a signal out of phase with the dry signal. The two effects are in some ways quite similar, and the terms are occasionally used interchangeably.

Flanging is technically a kind of phasing. It occurs when frequencies in the affected and the dry signal go out of phase with one another and produce interference. The difference between flanging and phasing has to do with the way the phase cancellations are produced: a flanger delays the entire signal, thus sends all of the frequencies of the signal out of phase with the dry tone, while a phaser generally manipulates some number of specific frequencies in the signal. Subjectively, this gives flangers a pronounced and regular ‘whoosh’ sound and phasers a more space-y, random, or unsettling alteration to the sound.

Stereo phasers use two identical phaser circuits for the left and the right channel and put them out of phase with one another.

That’s really interesting, but which one should I buy, Mr. Smarty-Pants?

All this technical stuff is nice, but how should you pick one?

Well that depends on what you’re looking for. There are flangers and phasers that offer many ways of manipulating the sound, as well as ones that produce a specific effect without much variation: one knob and a switch or two. Some of these are really well known, like the ElectroHarmonix Small Stone and the MXR Phase 90. They sound like they sound, and lots of people think they sound really cool.

Two famous examples:

  • The classic Eddie Van Halen sound from early Van Halen records was produced with a Phase 90 and an MXR M117R Flanger, and
  • The late 70’s Rolling Stones sound on tunes like “Shattered” is all about the Small Stone.

That’s great, but which one should I buy?

Only you can decide what you want from your sound. But here are some questions you should ask yourself before you go shopping:

  1. Am I looking for a pedal with a signature sound, or one that can do a bunch of different things?

Flanger pedals tend to have a wider range of control, because phaser pedals’ selling points tend to revolve more around a signature sound based on hardwired presets.

There are phasers with a wider range of control that edge into full Low Frequency Oscillator territory, and are like having little synthesizers at your feet. They can also set you back $300 or more.

So you should decide whether you want a specific kind of effect, like a Phase 90 or Small Stone, or a versatile box that can produce a wide range of effects, like the Moog Moogerfooger. If you’re looking for a box with a signature sound you can skip the next questions and go on to my final bit of advice.

If you’re looking for a versatile box, there are two more questions to ask:

  1. How many parameters can I control?
  2. How much control do I have over each parameter I can control?

Phasers and flangers both have controls for speed and depth, and often a “feedback” control (sometimes called something like “enhance” or “sensitivity”). Together these control how fast the effect is, how wide the effect is, and how prominent it is in your mix.

Flangers often also have a control called “delay time” or “manual” that determines the intensity of the effect. This is different than the effect’s prominence in your mix. It determines something more like how “off” or skewed the effected sound it, while the above effects have more to do with how the effected sound relates to the dry tone.

Some pedals allow you to control a wide range of parameters, some allow you a wide range of control over each of the parameters, and some offer both. Only you can decide whether you want to have a lot of versatility, the ability to make your sound crazy wild and over the top, or both. So:

A Final Bit of Advice:

Once you have an idea what you’re looking for, look at the range of pedals available on the website of an online music retailer. Search for “flanger” or “phaser” and browse the list of options that comes up. Then browse manufacturer websites or search on YouTube for demos. There are videos online for almost every kind of pedal available produced by the manufacturers themselves, as well as by music stores and private individuals that demonstrate the range of control each pedal offers, and its personality (or lack thereof). These demos can sometimes be even more valuable than trying out a pedal yourself, because they are produced by someone who has already spent a lot of time with the box, and who may be privy to the way it was constructed and designed.

Bruno Sturgess loves to help musicians get the most from their effects pedals.

Filed Under: Equipment, Pedal Effects Tagged With: analog, controls, delay time, digital, effect, electroharmonix small stone, flanger, flanging, input source, manual, Moog, mxr phase 90, pedals, phaser pedals, phasing, signal processing, signature sound, slowing, sound, speeding, splitting, tone, versatile box, wide range

What is a Talk box and how does it work

September 12, 2011 by Chris

Have you ever wondered how a Talk Box really works? I’ve wanted to get one of these things ever since I bought the legendary Frampton Comes Alive way back in 1978. If I still have your attention then read on!

A Talk Box is referred to as either an effects unit/device or pedal. This device first showed up way back in the 1930’s but who the heck was around then to remember it now. So let’s fast for ward to the mid 70’s when it became popular again by Peter Frampton.

First off the Talk Box receives or takes in an electronic signal (let’s say through a guitar chord to simplify things here). This signal comes from an electrical instrument coming directly from an amplifier. This signal is played through a fairly small internal speaker.

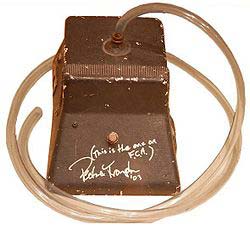
Peter Frampton's origonal Talk Box

Peter Frampton’s original Talk Box

Now they have this airtight flexible plastic tube that captures the sound and shoots it towards the open end which you place into you mouth. On all pedals there is a toggle  switch that allows the musician to send the signal to the amplifier or to this tube. You can use your lips, tongue or mouth to help form the distinctive sound that you are looking for. At this point you can project this captured sound back out your mouth and into the microphone.

So there you have it!

Keep on Jammin’

Follow my blog with Bloglovin

Filed Under: Equipment, My Experiences, Pedal Effects Tagged With: effects, guitar, how a talk bax works, how it works, music, pedals, peter frampton, plastic tubing, special, talk box, unit, vintage

  • « Previous Page
  • 1
  • 2
  • 3
  • 4
  • 5
  • …
  • 68
  • Next Page »

Categories

Sites to Visit

Eavestrough Cleaning Toronto

Subscribe


Read Guitar Licks and Tips
in an RSS Reader
Subscribe Now!
It's Free!

Subscribe to
Guitar Licks and Tips
by Email
It's FREE!


Follow us on TWITTER!

Recent Posts

  • Four Of The Greatest Classical Pianists To Tinkle The Ivories In The Modern Day
  • How To Develop Yourself Through Music
  • Home Studios – The Best Way To Demo Your Band!
  • Forget The Beatles, We’re Going To Be Massive! – Forming Your First Band
  • Biggest Mistakes Made By Beginning Guitar Players
  • Two Unique Ways To Learn Guitar For Beginners
  • 4 Incredible Gifts That Will Capture A Music Lovers Heart
  • Top 5 Rock Guitarists Who Will Stalk Your Soul Forever
  • 4 Tricks To Improve The Sound Quality Of Your Headphones
  • How to Get the Most Out of Your Next Concert

Recent Comments

  • Guitar Boy on Biggest Mistakes Made By Beginning Guitar Players
  • Acoustic slant on old Door’s Classics – Guitar Licks and Tips on What you can get for 40 bucks and a smoke
  • ChrisBunn on Two Unique Ways To Learn Guitar For Beginners
  • motorcycle accident compensation claim on The Guitar Motorcycle
  • Oregon Wild Wood on 4 Essential Guitar Maintenance Tips

Tags

acoustic acoustic guitar band Bands bass Brantford Bruce Cockburn Canada Canadian concert day drummer ear electric event favorite Fender finger fingers fun Funny Gibson guitar guitarist guitar player guitars how to Humor instrument Jammin Live music music humor musician Musicians playing Rock song sound stage style technique Toronto Video work

Site Stats


Meta

  • Log in
  • Entries feed
  • Comments feed
  • WordPress.org

Pages

  • About
  • Archives
  • Become a Guest Blogger For Guitar Licks and Tips
  • Blog
  • Contact
  • Do Follow
  • Links
  • Privacy Policy

Connect with me

  • Facebook
  • Google Plus
  • Pinterest
  • Twitter
  • RSS

Copyright © 2025 · Metro Pro Theme on Genesis Framework · WordPress · Log in